When a new window starts letting in draughts, dripping condensation onto the sill or whistling on a windy night, homeowners tend to blame the product. Almost always, the product is fine. The fault is in how it was fitted — a corner cut on a day you weren’t watching, on a part of the job you couldn’t see once the reveal was plastered over.
The frustrating part is that these mistakes are well known, entirely avoidable, and clustered among a handful of installers who compete purely on price. This article is a plain catalogue of the most common ones in Spain: what each shortcut is, what it does to you, how long it takes to show up, and how to make sure it doesn’t happen to you. Use it as a checklist when you read quotes and watch the work. And because every installer on Estimia is vetted before it can take an enquiry, it doubles as a map of exactly what that verification is designed to filter out.
1. Fixing with foam only — no mechanical anchors
The single most common and most serious mistake. The frame is held in the opening only by expanding foam, with no frame anchors, expansion bolts or fixing lugs into the masonry.
- Why it happens: it’s faster and needs no drilling. The window looks perfectly fixed on day one.
- The consequence: foam is an insulator, not a structural fixing. The frame slowly moves, sashes drop out of alignment, doors stick and locks stop engaging. On large terrace sliders the loads are high enough that this can fail in the first year.
- Timeline: alignment problems within 1–3 years; sooner on big or heavy openings.
- How to avoid it: require mechanical anchoring — fixings every 25–40 cm and near every corner — written into the quote. A properly anchored frame should feel immovable before any foam goes in.
2. Poor levelling and squaring
The frame is fixed before it’s been levelled, plumbed and squared (diagonals checked equal).
- Why it happens: rushing, or working to an out-of-square old opening without correcting it.
- The consequence: the sash binds against the frame, gaskets compress unevenly, and the seals no longer meet all round — so air and water get through where the gap is widest. Hardware wears prematurely.
- Timeline: stiff operation is often noticeable immediately; uneven seal wear and the resulting draughts within 1–2 years.
- How to avoid it: the crew should level, plumb and shim, then check both diagonals before fixing. On completion, a sash closed on a sheet of paper should grip evenly at every point around the frame.
3. No protection of the installation joint
The gap between frame and wall is filled but not properly sealed — no interior airtight layer, no weatherproof-but-breathable exterior layer. Just foam, trimmed flush.
- Why it happens: sealing tapes and correct sealants cost money and time; foam alone is cheap.
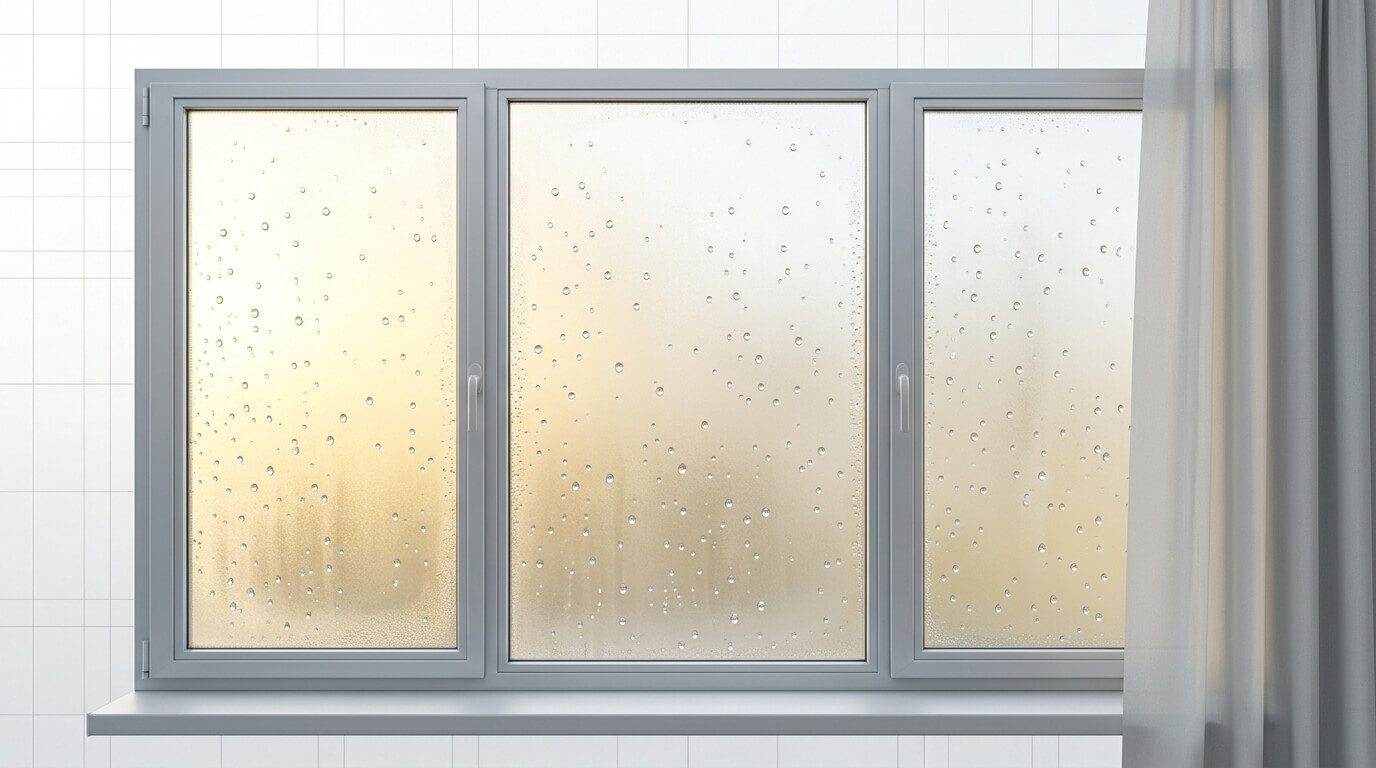
- The consequence: the joint is the part that actually keeps water and air out. Unsealed, warm indoor air carries moisture into the cold joint and condenses; outside, rain gets in. The result is the classic black mould line around a brand-new window.
- Timeline: first winter to second winter, especially in humid coastal and northern climates.
- How to avoid it: insist on a layered joint — sealed tighter inside than out — using vapour-control tape/sealant on the room side and a weatherproof, vapour-open layer outside. Our guide on what to watch for during installation describes exactly how a correct joint is built.
4. UV-exposed foam and cheap foam
Polyurethane foam left visible on the outside, or low-grade high-expansion foam used throughout.
- Why it happens: the joint wasn’t covered with an exterior seal; or cheap foam was substituted to save a few euros.
- The consequence: PU foam degrades fast under sunlight, crumbling within a year or two and leaving an open gap. High-expansion foam can also bow the frame as it cures, throwing the window out of square and jamming the sashes.
- Timeline: exposed foam visibly crumbles in 1–2 years; expansion-induced frame distortion appears within days of fitting.
- How to avoid it: specify low-expansion foam, always covered by an exterior seal so no foam is visible from outside.
5. Wrong sizing — gaps too big or too small
The new frame is ordered or fitted with an incorrect gap to the masonry.
- Why it happens: sloppy site measurement, or ordering from old drawings instead of measuring the actual opening.
- The consequence: a gap that’s too large can’t be sealed reliably and wastes insulation; a gap that’s too small leaves no room for the frame to expand and contract with temperature (significant on dark aluminium in the Spanish sun), causing it to bind or the seal to fail.
- Timeline: binding from thermal movement within the first hot summer; sealing failures over 1–2 years.
- How to avoid it: a proper on-site measurement (not a phone estimate) and a sensible, consistent perimeter gap. Accurate measuring is the foundation of the whole job — see how it sits in the overall replacement timeline.
6. Voids in the joint
The insulation/foam doesn’t fully fill the gap — there are hollow pockets behind the frame.
- Why it happens: uneven application, or relying on a single bead that doesn’t reach into corners.
- The consequence: voids are cold spots and air paths. They create localised thermal bridges where condensation forms, and they let the joint “breathe” air through, undermining airtightness.
- Timeline: localised condensation and cold-corner mould within 1–2 winters.
- How to avoid it: the joint should be continuously and fully filled — no gaps, no skipped corners — before the seals go on.
7. Ignoring waterproofing and the drip edge
No proper sill detail and no drip edge (goterón) to throw water clear of the wall.
- Why it happens: reusing a poor existing sill, or finishing flush without thinking about where rain goes.
- The consequence: rainwater tracks back under the frame and into the joint or down the façade, staining the wall and soaking the structure. On sliding terrace doors, blocked or missing weep (drainage) holes let water pool inside the track.
- Timeline: at the first heavy rain — and Spanish coastal gota fría storms find this fault fast.
- How to avoid it: confirm the sill slopes outward, has a drip edge, and that drainage holes are present and clear. Check it yourself by pouring water along the sill on completion.
8. No perimeter sealing inside and out
Sealant applied on only one face of the joint — usually just the inside, for looks.
- Why it happens: the visible interior gets a neat bead; the hidden exterior is left open.
- The consequence: rain enters from the unsealed outside, or (the reverse and worse) the outside is sealed airtight while the inside breathes, trapping moisture in the joint with nowhere to dry. Either way the joint fails.
- Timeline: 1–2 winters.
- How to avoid it: both faces sealed, following the inside-tighter-than-outside rule so trapped moisture can always escape outward.
9. Rushing the whole job
Trying to fit a flat’s worth of windows in a few hours, with no dry-fit, no levelling checks and foam trimmed before it’s cured.
- Why it happens: crews paid per job, not per hour, racing to the next address.
- The consequence: every mistake above, compounded. Rushing is less a single fault than the cause of most of them.
- Timeline: problems across the first two years.
- How to avoid it: be wary of a quote that promises an unrealistically fast turnaround. A standard window takes a couple of hours done properly; a typical flat is one to two days, not an afternoon.
A quick reference table
| Mistake | Main consequence | Typically shows up |
|---|---|---|
| Foam-only fixing | Frame moves, sashes drop, locks fail | 1–3 years |
| Poor levelling/squaring | Binding, uneven seals, draughts | Immediate–2 years |
| No joint sealing | Mould, water and air ingress | 1st–2nd winter |
| Exposed/cheap foam | Crumbling joint, bowed frame | Days–2 years |
| Wrong gap size | Binding or unsealable joint | 1st summer–2 years |
| Voids in joint | Cold spots, condensation | 1–2 winters |
| No drip edge / drainage | Water tracking back, pooling | First heavy rain |
| One-sided sealing | Trapped moisture, leaks | 1–2 winters |
| Rushing | All of the above | First 2 years |
How to make sure none of these happen to you
You can’t be a window installer overnight, but you can do three things that eliminate most of this list. First, get the spec and the method in writing — anchoring, layered joint, both faces sealed, drip edge — so there’s a standard to hold the crew to. Second, inspect on completion using the snagging checklist in our installation guide, and don’t pay the final invoice until it passes. Third, and most powerful: don’t hire on price alone.
That last point is what Estimia is built around. Every company on the platform is verified before it can receive an enquiry, so the race-to-the-bottom installers who cause most of these failures don’t reach you. You can request several like-for-like quotes from vetted installers near you and compare them on method and warranty, not just headline price — which is exactly how you avoid the quote that’s 40% cheaper because it skips half of this checklist.
Conclusion
Almost every “faulty window” is really a faulty fit: foam instead of anchors, an unsealed joint, no drip edge, a rushed afternoon. Each one has a predictable consequence and a predictable timeline, and each one is avoidable by specifying the method in writing, inspecting the result, and choosing a proven installer over the cheapest bid.
Compare verified window companies on Estimia and get several quotes side by side — then pair this catalogue with our guides on what to watch for during installation and the window replacement timeline to make sure your new windows perform for decades, not just for the first summer.