You can spend €600/m² on a premium triple-glazed PVC window with a class-leading Uw value, and still end up with cold draughts, condensation on the reveal and rainwater pooling on your sill. Not because the window is bad — because it was fitted badly. In Spanish homes, where windows are often replaced one obra at a time by whoever quoted cheapest, the installation is the part most likely to fail, and the part almost nobody inspects.
The uncomfortable truth is that the brand of profile printed on your quote matters far less than the two days a crew spends fixing it into the wall. A mid-range window installed correctly will outperform a top-of-the-range window installed badly, every single time. This guide is about that second half of the job — what a competent installation looks like, what quietly goes wrong, and what you should physically check before you pay the final invoice. Because every company listed on Estimia is vetted before it can receive an enquiry, the goal here is also to help you understand what that vetting is protecting you from.
Why the installation matters more than the profile
A window has to do three jobs at the perimeter where it meets the wall: keep water out, stop air leaking through, and avoid creating a thermal bridge (a cold path through the structure where heat escapes and condensation forms). All three of those jobs happen in the installation joint — the gap between the frame and the masonry — not inside the window itself.
Manufacturers test windows in a lab, sealed perfectly into a test rig. The number on your quote (Uw 1.1, 42 dB acoustic, Class 9A watertightness) is only achievable if the joint is built to the same standard as the rig. A sloppy joint can add 0.3–0.5 to the effective Uw and wipe out a third of the acoustic performance you paid for. So when you compare windows, remember: half the performance is bought, half is installed.
The three things that must be right
1. Anchoring (fixing into the structure)
The frame must be mechanically fixed to the wall — with frame anchors, expansion bolts or fixing lugs at correct intervals (typically every 25–40 cm and within ~15 cm of each corner). This is non-negotiable. A frame held in place only by expanding foam will eventually move: the foam is an insulator and a gap-filler, not a structural fixing. On large openings — terrace sliders, lift-and-slide doors — the loads are significant, and under-anchoring shows up as doors that drop, stick or won’t lock within a couple of years.
2. Levelling and squaring
The frame must sit level, plumb and square before it is fixed. Installers check this with a spirit level and by measuring the two diagonals (they must be equal). A frame fitted out of square may look fine on day one but will bind the sash, wear the gaskets unevenly, and let air through where the seals no longer meet. On a tilt-and-turn (oscilobatiente) the symptom is a sash that drags on the frame or a handle that needs forcing.
3. The installation joint — foam plus sealing tapes
This is the part that separates a professional fit from a cheap one. A correct joint is built in three planes, an approach you’ll see described as the “inside tighter than outside” principle:
| Layer | Position | Purpose |
|---|---|---|
| Interior seal | Room side | Airtight + vapour-tight — stops warm, humid indoor air reaching the cold joint |
| Thermal/acoustic core | Middle | Low-expansion PU foam or mineral wool — insulates and fills the gap |
| Exterior seal | Outside | Weatherproof but vapour-open — sheds rain while letting any trapped moisture escape |
The principle is simple and frequently ignored: sealed tighter inside than out. If the interior is airtight and the exterior breathes, any moisture that gets in can dry outward. Reverse it — foam exposed on the outside, an open gap on the inside — and the joint traps water, the foam degrades in UV within a year or two, and you get the classic black mould line around a brand-new window. In Spain this is most often done with low-expansion foam plus sealing tapes (impermeable on the outside, vapour-control on the inside), or a quality elastic sealant correctly tooled into a backing rod.
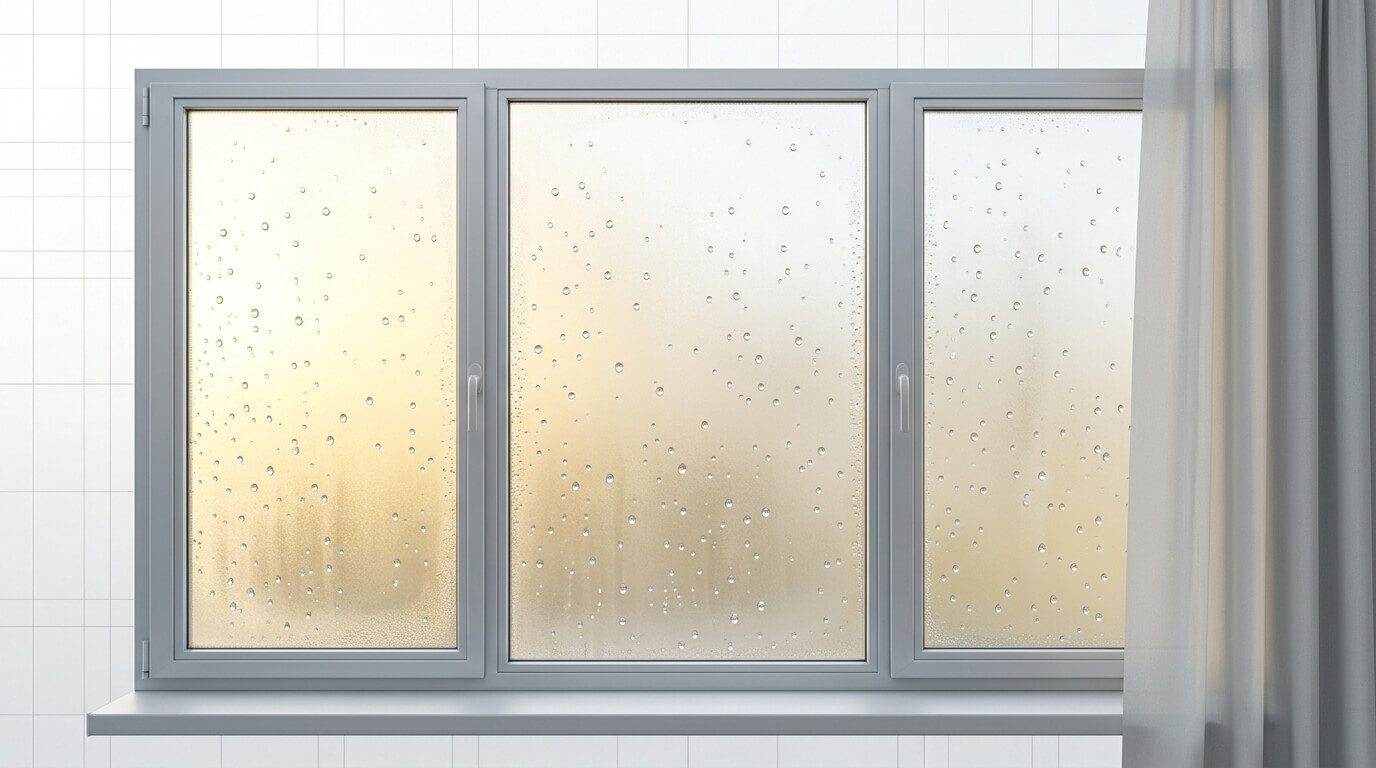
Avoiding the thermal bridge
The reason the joint has to insulate, not just fill, is the thermal bridge (puente térmico). Where the frame meets the masonry, you have a direct path for heat — and the coldest surface in the room is exactly where humid air condenses. Get this wrong and you see condensation and mould around the frame even though the window glass is dry.
Good practice in Spain, especially relevant under the CTE (Código Técnico de la Edificación) energy requirements, includes positioning the frame in line with the wall’s insulation layer where the construction allows, fully insulating the joint rather than leaving voids, and avoiding metal fixings that bridge straight through without a thermal break. This matters more in the cold interior (the meseta) and the northern Atlantic strip (Galicia, the Basque Country) than on the warm Mediterranean coast — but a mould-streaked reveal looks just as bad in Málaga as in Burgos.
What a good installation day looks like
It helps to know the rhythm of a competent job so you can spot a rushed one. For a standard flat, expect roughly the following:
- Protection first — floors, furniture and circulation routes covered. A crew that starts ripping out frames without dust sheets is telling you something.
- Careful removal of the old window, ideally keeping the reveal (mocheta) intact for a clean finish.
- Dry-fit and levelling — the new frame is offered up, shimmed, levelled, plumbed and squared, diagonals checked.
- Mechanical anchoring at correct intervals.
- The joint built in layers — interior tape/seal, insulation, exterior tape/seal — not a single squirt of foam left to ooze and be trimmed flush.
- Glazing and sashes hung, hardware adjusted, drainage (weep) holes checked clear.
- Finishing — reveals made good, sealant tooled, persianas and mosquiteras refitted.
- Clean-up and a walk-through with you.
A single standard window takes a competent two-person crew a few hours; a typical flat of six openings is usually one to two days. If the timeline matters to you, our guide on the window replacement timeline breaks down realistic durations stage by stage.
What to inspect on completion (your snagging checklist)
Before you pay the final invoice, walk every window and check:
- Operation: every sash opens, closes, tilts and locks smoothly with no forcing. The handle should fall naturally into position.
- Seals meet evenly: close the sash on a sheet of paper at several points around the frame — it should grip with consistent resistance everywhere.
- No daylight, no draught: on a windy day, run the back of your hand around the closed perimeter. You should feel nothing.
- The joint is finished, not exposed: no raw foam visible inside or out; sealant neat and continuous; reveals made good.
- Drainage: weep holes on the outside are open and point outward; the sill sheds water away from the wall (a drip edge / goterón, not water tracking back).
- Levelling: a spirit level on the sill and jambs; the sash sits parallel to the frame all round.
- Glazing: correct spec delivered (low-E, acoustic, the right number of panes), no scratches, spacer bars even.
- No new cracks in the surrounding plaster or render.
Many of these correspond directly to the most frequent failures — see our companion piece on the most common window installation mistakes for what each symptom means a few winters down the line.
Documentation you should walk away with
A proper job leaves a paper trail. Ask for and keep:
- The commercial and technical specification of the window actually fitted (material, profile, glazing, Uw, acoustic rating, watertightness class) — confirm it matches what you ordered.
- The CE marking / declaration of performance for the window units.
- A written installation warranty covering the fitting and sealing, separate from the manufacturer’s product warranty. Two years on labour is a reasonable minimum; many serious companies offer more.
- The invoice with IVA, which you’ll also need for any energy-efficiency IRPF deduction or remaining NextGenerationEU grant (note the EU programme runs to December 2026).
If the company is reluctant to put the spec or the labour warranty in writing, treat that as the warning it is.
How Estimia reduces the risk before it starts
You cannot personally audit an installer’s anchoring technique before you hire them — but you can avoid the ones most likely to get it wrong. That is the point of an aggregator. Every company on Estimia is verified before it can receive an enquiry: it isn’t a list of whoever paid for an advert. You can request several quotes from vetted installers near you and compare them around the same specification, so the conversation is about who fits it best, not just who is cheapest. When the quotes are like-for-like, the documentation and the labour warranty become part of what you’re comparing — exactly the things that separate a window that performs from one that merely looks the part.
Conclusion
The window is only half the purchase; the installation joint is the other half, and it’s the half that fails quietly. Insist on mechanical anchoring, a level and square frame, and a layered joint sealed tighter inside than out to keep water out and the thermal bridge at bay. Then inspect the result against the checklist above and keep the paperwork. Do those things and a mid-range window will outlast a premium one that was rushed into place.
Compare verified window companies on Estimia and get several like-for-like quotes side by side — then use the checklists in this guide, our list of common installation mistakes and our replacement timeline to make sure the job is done right, not just done cheap.